Wednesday, May 20, 2020

DAY 15 - EASIEST SHAKERS EVER


Today's guest artists were Kristina Werner and Heather Ruwe. Each did her own version of easy shaker cards. 

I used Kristina's method of cutting 8 frames from heavy copper metallic cardstock, adhered one to an acetate circle, then stacked and glued the rest, filled the well with some sparkly bits, and then attached the whole thing to my prepared underwater scene. I added some gold Nuvo crystal drops to the porthole to act as the bolts. I used two stamp and die sets for my first card which had so many pieces that I turned it into a 5x7 inch card.


I first stamped several images from the MFT pirate set and then did the same with some cute sea creatures. 

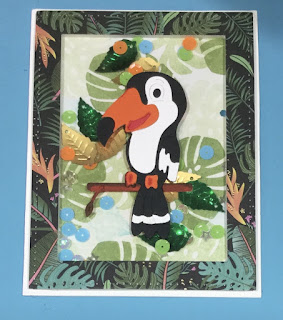
(The toucan die in the lower right corner was used to make my second card)

I'm trying to use up as many bits and bobs that I've made over the ages, and I had a pale blue alcohol ink piece that I took and cut several circles from as the background of my shaker. 

In the upper left piece I stamped some sea creatures with Memento black and dried that with my heat gun. The ink still wanted to remain wet and didn't play well at all with the background blue. I finally used Copics to color in the creatures which was disastrous. The Copics picked up the stamped black ink and I finally outlined each image with a fine black Sharpie after coloring. (It actually looks better in the photo than in person.) On the other two circles I temporarily placed other images that I had stamped, colored, and die cut which seemed to give me a cleaner result. On the upper right circle I used a light layer of Nuvo turquoise glitter drops but it was really splotchy. Eventually I used the lower circle and several of my diecut images glued to the shaker background.


My second card used a tropical paper frame mounted on foam tape. I used first and second generation stamping of tropical leaves for the background. Although it's hard to see I had gold and green metallic leaves from a sequin mix which I used in addition to other regular sequins that matched the colors in the patterned frame. I used my toucan die to cut all the bird and branch bits that I pieced together and glued. I attached it to to the front of the acrylic window and mounted the whole shebang onto a white A2 card.

Tuesday, May 19, 2020

DAY 14 - WATERCOLOR INSPIRED BY CHILDREN


We were supposed to use watercolors today (or other markers, inks, etc.) to tap into our inner child. What I like about this class is that you needn't do the exact techniques that are presented. Instead their ideas can be a springboard for ours. Here I used a combination of watercolor crayons, Brusho powder, and some tube watercolors. 


The background was inspired by landscape quilts that use a variety of fabrics to suggest rolling hills and fields. I added some die cut layered white flowers and then used the thin strips of watercolored paper (from the trim of the main panel) to create the flower stems and leaves in the manner a child draws flowers. I'm not going to add a sentiment yet (which I'll put in the upper right corner) until I decide what the occasion will be when I send it.


Monday, May 18, 2020

DAY 13 - DIE-CUT BACKGROUNDS


Both of today's presenters had many examples of piecing die cut backgrounds. Jennifer McGuire's were very complex and striking, but I didn't have enough time today to do them justice. Andy Granick's were more straightforward and gave me lots of ideas for quick cards. 


The Waffle Flower Big Dots Stamp & Die Combo is a set that I use over and over again. The sentiments are varied and bold, and I just love the versatility of the die. 


I die cut the background in both white and silver and layered them. I then cut rows of circles from sparkly cardstock using the die. I layered those pieces on the off cuts of the backgrounds and added them in a pattern of colors. The card is more bright and cheerful than it shows in the photos.


I'm caught up with all the days' homework assignments for now. Let's see what tomorrow brings.


DAY 12 – GEOMETRIC PATTERNS WITH BASIC SHAPES


The video today was by Laura Bassen. As always she did a variation on rainbow colors but this time she used 4 shades of each color cut in 4 sizes of squares in descending shades. She added dimension to each layer and her results were spectacular.

As I tried to come up with an original idea I kept thinking (in) circles. Then I wondered if I could make a wreath out of layered circles and also if I could use the Gina K wreath builder to help place them evenly. So that's what I did!

In order to cut a lot of circles out easily I used 3 background dies, each with different size circles. It took a while to find enough shades of each color but eventually with enough scraps and the help of one Copic marker, mission accomplished.


I found a sentiment that would fit in a circle that would fit in the center of my "wreath," stamped it in black on white CS, then glued that on a slightly larger black circle which I adhered to the card with foam tape. I matted the 4 1/2" card front onto black CS which was then attached to a 5" square white card base. 


Thanks for the neat idea, Laura!

😍


Sunday, May 17, 2020

Day 11 - Anti-Coloring


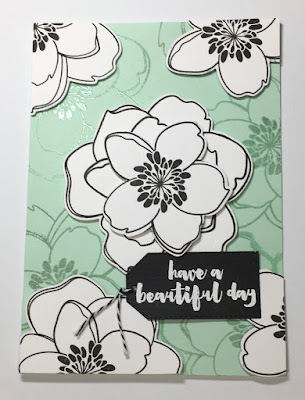
Today's theme was anti-coloring. One of my all-time favorites is Julie Ebersole and her video was great as always. I loved how she used Versa Mark to create a subtle background, then used the same image stamped in black on white, cut it out, and attached it to her background piece. Since I have the Mondo Magnolia stamp and die that she designed for Ellen Hutson, I chose that to pay homage to Julie.


The Mondo Magnolia die set will cut out both the entire stamped image or just the inner portion of it (as well as the stamen section). I used both sizes of the flower images and attached them to the card front with foam tape. For the center flower I layers the smaller flower on top of the large image with foam tape and turned it a bit so that it looked like this flower had even more petals.


Donna Mikasa is new to me but her card was also awesome. Stamping an image dipped in water onto a distress inked background gave an ethereal effect and then she, too, stamped her image onto white cardstock and attached it to the background. She used a favorite stamp and die set of mine, Altenew's Leaf Canopy set, so I just used it too so that I didn't have to tax my brain too much.

Friday, May 15, 2020

Day 10 - Letter Substitution


Substituting a stamped object in place of a letter has so many possibilities. I have 3 or 4 lemon themed stamp sets and thought about substituting a lemon for the letter 'O'. However after looking through my stamp stash I found donut stamps with cute sentiments so that's what I used.


I cut a frame from some donut paper to carry out the theme, then colored the donut image with Copics to match the frame background and added sprinkles. It's mounted on a 5 x 7 pink card base. Because the white center panel still looked a little bare, I added sprinkles to fill in the glaring empty white areas You can never have too many sprinkles.

Thursday, May 14, 2020

Day 9 - Cloud Gazing


I really enjoyed Daniel West's video today where he used stamps in ways that were different that the way they were meant to be used. I kicked around a lot of ideas but since I have hundreds and hundreds of stamps, why do I want to come up with different ways to use them when there are many of my stamps I've never even used in the way they were intended? Don't know if that makes much sense but it just didn't inspire me.


Mindy Eggen used the same idea only using dies. It was easier for me to visualize how I could repurpose them in a new way. I picked two of my Lawn Fawn Hillside borders, but instead of creating hills I cut chunky pieces out of bright cardstock and then pieced them together to make my background for my 5 x 7 card. I added some stars from the same colored CS as well as silver star sequins. My birthday sentiment is a stack of four diecuts to give the card some dimension.


DAY 8 - Faux Dip Dye


Kristina Werner created gorgeous faux dip dye pieces using pan watercolors and Galina Flippenko used Distress Inks and liquid watercolor to create hers. I chose the simpler alternative of Galina's although I used pan watercolors.


The first piece of watercolor paper that I used made weird splotch marks after applying just the first color. I changed papers and had better luck. Shades of green and blue were used for the background and after cutting it down to 4 x 5.25, I attached it to an A2 card base. I die cut the sentiment from silver paper but the shine doesn't really show up in the photo.


Tuesday, May 12, 2020

Day 7 - Vellum Overlays


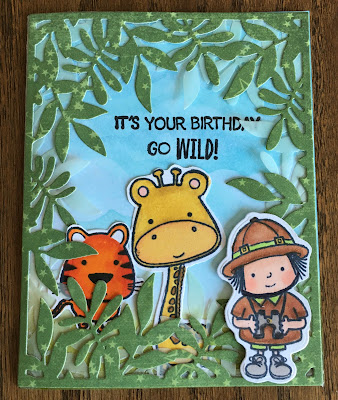
Caly Person showed three ways to use vellum overlays on her cards. I used the one that layered a die cut patterned green cardstock over the same die cut (turned upside down) that was cut from pale green vellum. I used Distress Inks to create a sky background with pale clouds and a green jungle floor. I used Copics to color several figures from the Safari Friends stamp set that also had the sentiments that I stamped on the background.


The stamp set was a free set that came with Papercraft Essentials magazine and the frame die I think was a Memory Box one from several years ago. I've used the frame die a lot but had never used the stamp set so it was great to break it out!


Monday, May 11, 2020

Day 6 - Creative Color Blocking


Today the guest instructors were Laurie Willison and Jeff Lindberg. Both had different approaches to color blocking. However Jeff's card examples really blew me away. I loved everything about them from his choice of colors, inks, embossing, pattern, design - well, you get the idea. Despite the hundreds of stamps that I own, background stamps are in short supply. I especially like the geometric embossed images that Jeff used so I had to hunt around to see what I could use.

I knew that I wanted to emboss on papers with subtle designs and then I checked my stash to see if I had any usable embossing powder other than white and clear. I ended up choosing papers that went with a pretty Wow brand Under the Sea embossing glitter that would also work with silver metallic embossing powder. I used both powders on the papers which were so pretty themselves that I wanted them to still show a lot under the embossing. I finally settled on a C9 turnabout stamp that had triangles. I never turned the stamp in another direction so the pattern was pretty scattered.


I cut rectangular pieces and arranged them on and A2 piece of white card, then later cut it down and attached it to a piece of heavy silver card that was slightly smaller than the A2 white card base. I embossed my sentiment the in same silver embossing powder.


I'm finally caught up with my Card Camp homework. Let's see how long that lasts!

Day 5 - Stencil Shading


I loved the pale, light, lovely effect that Lydia Fiedler achieved using a stencil and blending brushes. She lightly blended a pale brown ink before adding pale color to her floral image.


My stencil is also a floral one (the one that the stencil embossing technique ended up being mangled in my Big Shot Express). I used Antique Linen Distress Ink initially and then added shades of pink (Tattered Rose, Victorian Velvet, and Spun Sugar) for the flowers and Bundled Sage for the leaves.


I cut the piece down to fit on a pale pink card base and added a sentiment. I'm pleased with the outcome.

Day 4 - Sentiments


Nina Trapani created some neat rainbow sentiment strips in her video Make a Statement with Sentiments. I need a couple of graduation cards so thought I would use this idea to make one.


I made a 5 x 7 card by stamping 'congratulations' in Versamark ink on several colors of cardstock. I've been making cards for over 10 years, yet I forget to use my antistatic powder before stamping the embossing ink at least 97% of the time. Finally getting some usable strips, I mounted them with foam tape onto black CS which was attached to the card base.

I'm still two days behind making my cards, so I better get back to it! More later!

Friday, May 8, 2020

Day 3 - DRY-EMBOSSING WITH STENCILS


Cathy Zielske demonstrated how to dry emboss using a stencil. I've never seen it done before and most likely won't use it much since (1) I own a zillion embossing folder and (2) one of my stencils got torn up doing it 😞However the embossing was quite pronounced and great for my cards. I didn't try it on colored cardstock so I ended up blending Distress Oxides on the floral backgrounds and Distress inks on the brick pattern a la Carly Tee Minner. 


I don't know about you but I have containers full of embellishments that I've created over the many years as well as purchased ones that have piled up, so I dipped into all of that stash-i-ness for today's cards.

First I found two layered butterflies where I'd used alcohol inked experiments as the base for each butterfly. For the green card I stamped 'Enjoy' in green ink on black CS, then heat embossed it with clear powder and cut it out with the matching die.


On my blue card I used a frame that was leftover when I cut down a card front for an earlier lesson. I stacked five layers of the sentiment 'with love.'


The last card was the easiest since I had some journaling cards gathering dust and a container filled with layered flowers I'd made in my Tim Holtz phase. I slapped those babies onto my brick wall and called it a day!


Thursday, May 7, 2020

Day 2 - Make Your Own Stripes


I loved today's theme - make your own stripes. Jennifer McGuire and Angelica Conrad provided the inspiration and I was ready to go!

Plaids are an obsession of mine so I have several stamp sets that I use to create them - two from PapertreyInk, one from Waffle Flower, and another Hampton Art Foot Long set. These were perfect for embellishing my stripes.


I ink blended my background using shades of pink and peach. Then I stamped on top of the blending with dots, dashes, and striped lines from my stamp sets. 


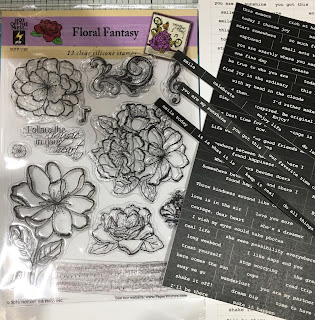
I wanted an open image so that the stripes were the star of the card, so I used one of the flowers from the Hot Off the Press set, Floral Fantasy. I added a sentiment from a digital word strip set that I purchased on Etsy and then printed.


I usually have smudges in any ope white space, but I was super careful this time to avoid them. However after I applied my sentiment a bunch of random pink marks had mysteriously gathered at the bottom of my card which was hugely annoying!    
😡
 I ended up inking a stripe at the very bottom and then stamping the musical lines from the Floral Fantasy set over it in a shade darker color. Oh well, stuff happens!

Wednesday, May 6, 2020

SPRING CARD CAMP 2 - Day 1


We're back with a sequel to Card Camp 1. The first lesson was about masking and Kristina Werner shared a video. She suggested printing out a large letter on the computer and then using it as a pattern to cut out a mask. Instead I used my Silhouette Cameo with the setting on 'clear sticker' and I cut out the masking paper letter with no problem. Instead of blending the CS background I chose to stamp tiny floral images in a multitude of colors and then outlined the letter in black before attaching to my card.


The negative masking lesson was by Heather Hoffman. For my background I used my new 3-D Sizzix Embossing Folder and colored the raised edges in a darker tone than the recessed areas of the flowers/leaves using alcohol markers. I stacked 5 layers of circles for my center sentiment which combined a layered 'hello' die cut and a stamped 'my friend' sentiment.


Both techniques were enjoyable and ones that I will use again!