Tuesday, July 23, 2013

Cricut Boxes and a Birthday Card

I think I mentioned that I recently got a Cricut Mini. Using the 'Mini Books' cartridge I experimented making the small box in two sizes.  They're about 3/4" in depth. The top one was my first effort but is quite flimsy. The bottoms one is embossed and inked and then lined with a layer of card stock to give it more stability. They have velcro closures.


Here's a birthday card I recently made. I love the large Tim Holtz 'Best Friends' stamp. It's a bit hit-or-miss trying to ink it in 3 colors, so I ended up having the most success using ColorBox Cat's Eye ink pads. The pointed ends help ink hard to reach areas of the stamp.


I haven't had the best luck getting a solid, dark image of the boy and his dog no matter what type or brand of ink pad I use, but I think the toned down result works here. I stamped the central image on a manilla sheet that has mustard and gray paint blotches and streaks printed on it. Although it looks quite white in the photo, it's actually more cream and looks quite vintage. I used a piece of a weathered clock die cut, a New York Central train ticket that I stamped with Ladybug ink on gold card stock, several background papers, and a Tim Holtz muse token to embellish the card front. 


Monday, July 22, 2013

Finished Project

This morning I finished assembling my shadow box (for lack of a better term). I started with the box that was already painted white and weathered.


I gathered, measured, and cut background papers and then glued them in place.


After arranging the elements from yesterday's post, I added a few more embellishments and fastened everything in place.


Now I just have to find a place to hang it :)

Sunday, July 21, 2013

Family Project

Several weeks ago I found two good sized shabby chic shadow boxes at Home Goods that were on clearance. I wasn't sure what I would use them for, but they were too good to pass up. Maybe I could use one to display a few of the tags and cards that I'd recently made, but then I decided to make new versions of some of my favorites using family pictures. I also wanted to use a blue and brown color scheme and so the project began.

Here are pictures of my mom and dad as young children. My dad looks to be about six or seven and my mom had to be four. I printed out copies of the photos and slightly colorized them using DI. I was able to cut the frame and its shadow on my dad's card using my new Cricut Mini. That background used a favorite script embossing folder and then was colored with Vintage Photo and Walnut Stain DI. Note that I included some of my cockeyed roses.


Next I printed out photos of my husband's parents. The only picture we have of his father as a child is really poor quality so I used his high school graduation photo. His dad was somewhat of an artist and had colorized his own background blue, so I tried colorizing the black and white print the same way. There's been some debate about whether the photo of his mom is of her or an older sister. We think by comparing it to another picture that it is definitely his mom, and I think the pose is so cute. I added a piece of mica over the top of her photo for a vintage feel.


I also wanted to include a photo of our two sons but wanted it to have an old fashioned feel, so I settled on a Halloween picture when one was a cowboy.


I've been busy making rosettes lately so I will throw in a few of those as well as a picture wheel with photos of our family when we are children as well as adults plus two of our grandson who is still a toddler.


 I'll post a picture when I've assembled the whole thing.

Tuesday, July 9, 2013

90th Birthday Celebration

We celebrated my mom's 90th birthday on July 5. All four of her children, eight of her ten grandchildren, and three of her four great-grandchildren were there to celebrate along with spouses and some very close friends.

New craft supplies often serve as the impetus for making my cards. I recently added the Tim Holtz (who else?) Picture Wheel die to my collection so I was off and running. Also for our anniversary my husband and I gave ourselves a new color laser printer. When we first looked to buy one many years ago, they started at a staggering $25,000!! Obviously that was - and still would be - way out of our price range!!! Fortunately this technology has dropped over the years to a very affordable price. Although the cartridges are pricey, it is still a better bargain than buying colored ink jet cartridges that seem to run dry every other day. The advantage of laser over ink jet is that the ink is permanent and you can use Distress Ink to alter the black and white images. You can also use the laser prints for photo transferring using packing tape to make translucent images.

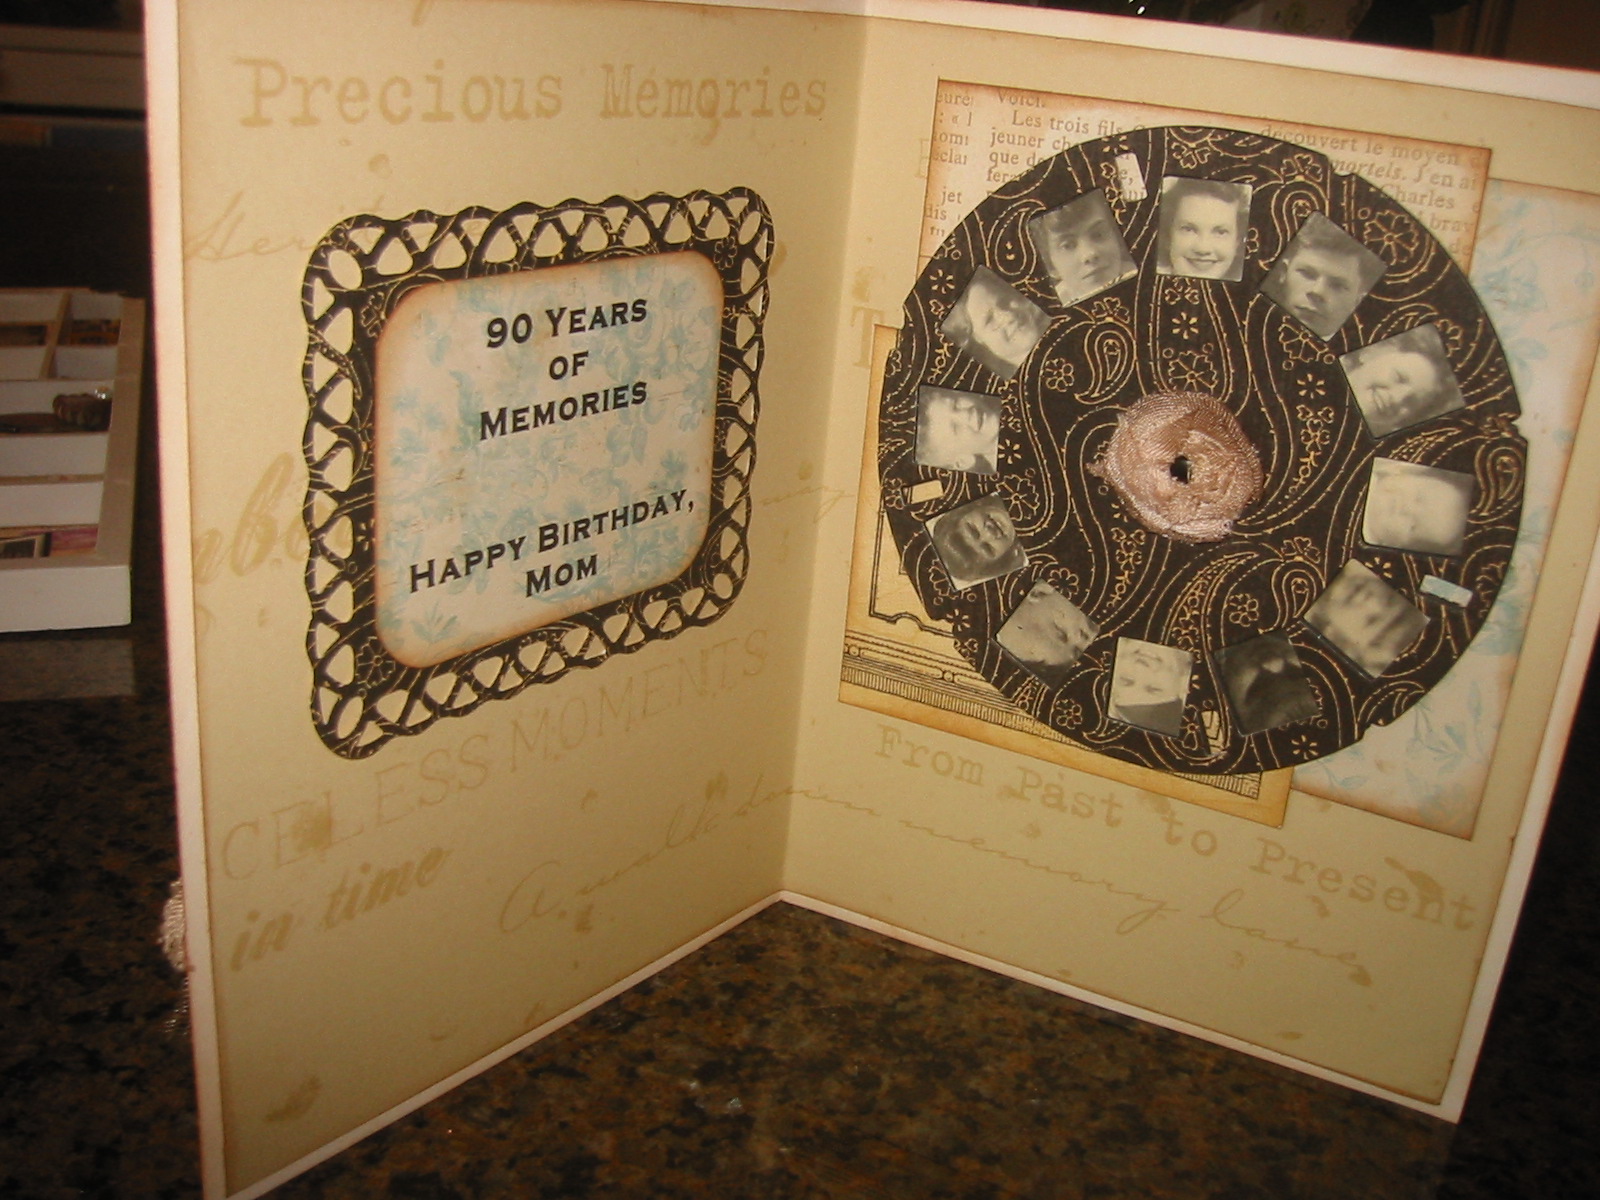
I began by selecting a favorite photo of my mom when she was four years old which I printed out and color tinted with Distress inks. I aged some TH (who else but Tim Holtz) metal numbers, dyed some of his shabby chic flowers, layered a few vintage-look papers as a background, die cut the layered photo frames using both the Time Wheel die and Scalloped Rectangles Nestabilities, and added some buttons.


The inside of the card used the TH picture wheel holding pictures of my mom, her parents and siblings, and her husband and children (and it actually spins). Wasn't it fortunate that there were the exact number of openings that I needed for all the family members?


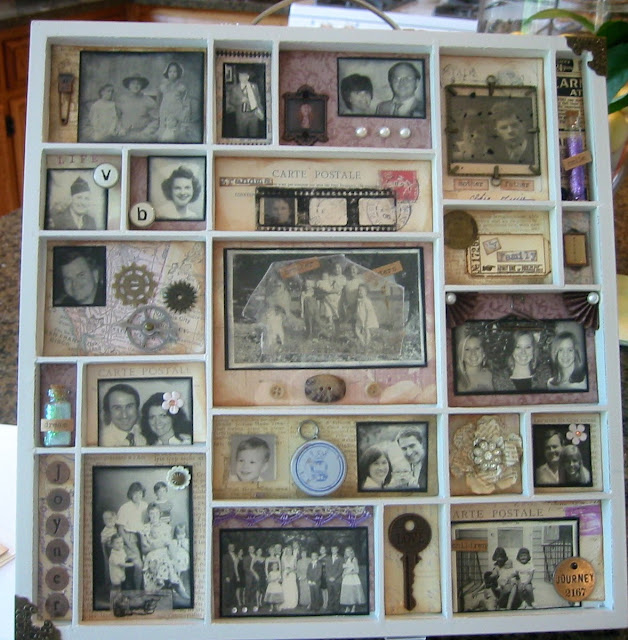
It's quite difficult to buy a gift for a 90-year-old! With only a few days before the big event I was in Hobby Lobby and found a great memory tray that inspired my gift for her. When I got home I measured each of the 23 openings, then chose and sized photos of my mom, her parents and siblings, her husband and children and grandchildren. I also added a tiny photo of her Grandma Murphy with whom she lived after her parents died. The photos were printed out in black and white (using our new printer :), and I aged them by stamping Antique Linen Distress ink all over them.  I have quite a collection of metal embellishments which added to the vintage look. My favorite item was a parking coin for the Harvey Bank which was from our hometown over 50 years ago. There is a tiny frame with her maiden name, Ritchie, printed on it,  and I wrote out her married name, Joyner, in coppery discs. I threw in a few TH elements atop several vintage looking papers and her piece was finished.* My mom seemed very happy with her gift, and I hope the memory try will spark many memories for her!


*Notice that I did NOT use any lopsided roses!

Monday, July 8, 2013

Just a Couple of Cards

Our 32nd Anniversary was coming up, and I used a couple of the Graphic 45 papers from Le Romantique to make my husband's card. Our wedding colors were peach and cream -  and so is the paper! Also, if you squint really hard, the bride vaguely looks like a younger version of me :) I used a paper punch to create the strip down the middle and the Spellbinders 'Lattice Rectangles'  and Classic Ovals Nestabilities as the frame and insert. The lopsided rose is one of the roses I talked about in the Civil War blog entry.


inside

Another South Carolina niece, Chelsea, just graduated from the University of Georgia, so I made her graduation card in Georgia's colors using the same 'Lattice Rectangles' Nestability, TPC papers,  adhesive die cuts. . . and another lopsided rose!!!


Sunday, July 7, 2013

Civil War Card and Variation

The real reason why I became interested in photo stamps (March 6, 2013 blog) is seeing a fabulous Civil War card on YouTube done by Kate Palmer. She gives quite detailed directions about her process and I became obsessed with owning the Civil War soldier stamp by Oxford Impressions. I also had to have the Cuttlebug Script embossing folder and a few other supplies before I could finally try to create my own version of Kate's card.

I began by stamping the soldier image using several colors of dye inks before deciding on one. I used DI to further "age" him. I colored a piece of manilla CS with Vintage Photo and Walnut Stain DI, embossed it with Script, then added more Walnut Stain DI to the raised images.


I gathered my embellishments to complete the card.


Recently I picked up the Tim Holtz Tattered Pinecone die on clearance because I had watched one of his videos showing how to use the die to make roses. There is a real learning curve to making them, and most of mine have come out quite lopsided. It begins with a spiral cut piece that you roll and fluff out. Easier said than done! They still don't compare to the real ones I got for my birthday (right).  At any rate I finally came up with several that actually resembled roses.


Another minor obsession I had was with a Tim Holtz tag featuring a little girl that really reminded me of my niece, Lindsay. It was used to demonstrate how to tint a black and white photo using Distress Ink. I thought he must have used a stamp because I saw other people using the same image in their projects. Imagine how exited I was to find that Tim shared the jpeg image of her so I quickly printed out several copies and began photo tinting. 


Finally the roses and little girl came together in a card that was inspired by my Civil War card.


Lindsay was just in from South Carolina so a made her a bookmark using her look-alike! A faux relative for my real relative!


Saturday, July 6, 2013

Fathers' Day

I have a backlog of photos from recent projects. The Fathers' Day cards I made for my husband and son  were so fun to make and I learned a lot of new techniques along the way!

The thing I love most about paper crafters is their willingness to share ideas and techniques by providing detailed instructions. Since imitation is the highest form of flattery, I used a telescoping card created by Shelly Hickox as a template for my cards. Although hers included some awesome metal wings that extended out to the sides, my attempt at making a set from grunge board and foil tape was a dismal failure!

There are three separate sections that are distinct when fully opened (last picture at the bottom), yet they fold to create this entirely unique visual.


The first section began life as a distressed circle using a dictionary page edged in vintage photo Distress Ink (aka DI), then coated with UTEE (ultra thick embossing enamel. I stamped the 3 gentlemen on cardstock (CS) which I colored with Distress Markers. The last addition is a die cut gear that was painted with black acrylic and embossed with silver embossing powder.


The largest section is a Weathered Clock die cut also painted with black acrylic and backed with kraft CS embossed using a gears embossing folder. I left the clock finish dull, but in retrospect I wish I had made it shiny using UTEE.


The final section was a dry embossed black CS circle that was topped with a weathered gear that had been painted in black and embossed in areas with gold embossing powder. I finished it with a clock face, game spinner, and Tim Holtz hitch fasteners. 


I also added assorted gears and pieces to the other two sections. When the sections were attached and extended, this was the finished product.