
Monday, September 9, 2013
Mothers Day Card
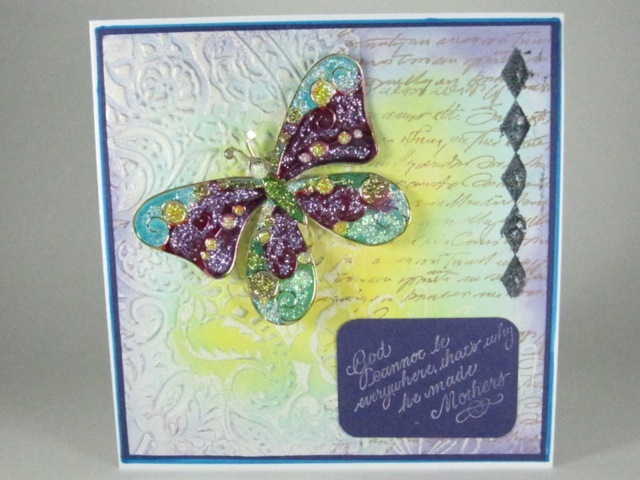
I know it's not the season for a Mothers Day Card, but I just came across a photo of one that I did for my mom. It was made using my go-to tools: embossing folder, stamps, and Distress inks. The unique feature of this card is the 3D butterfly. I used an Elizabeth Craft metallic Peel-Off sticker which was applied to double-sided tape (leave the backing on one side until applying it to the card). Typically ultra fine glitter is used to fill in the open areas, but I used alcohol ink and Stickles instead because I didn't have the glitter colors I wanted (very expensive) while the others I had on hand.
Wednesday, September 4, 2013
September Tag of 2013

After seeing Tim Holtz's post featuring his new layering stencils, I preordered some right away. That's why I was so excited that his September tag used them in so many different ways. However I was really bummed when I got an email saying that my order won't be shipped until late September, so I had to rethink my options without spending any more money. Then I starting wondering whether I could cut my own stencils from acetate using my Cricut mini. Several people posted success stories online so I decided to give it a try. Overall I was happy with my results.

The embossing paste and Distress paint techniques using the stencils went smoothly. The problem I ran into was using Distress stains for the background color. I sprayed the tags before applying the stain and although it went on smoothly, the colors were too vivid for my taste. Here are the first ones I did.

Next I tried diluting the stain, and I was getting closer to something I liked.

I think the bright red was the jarring note, so by eliminating it I was happier with this next background. Still it wasn't to my taste.

Finally I decided to stick with shades of blue and I finally achieved a background that I was happy with. Instead of introducing a lot of other colors with the Distress inking portion, I just used a variety of blues for my next layers of stenciling (Chipped Sapphire, Broken China, Faded Jeans, and Tumbled Glass) as well as Black Soot. The pear was stamped using black Archival ink and the words were shaded and outlined with Pumice Stone ink and Distress marker. The tag was embellished with a keyhole and a charm that I first painted with black acrylic paint (which I partially removed) and then highlighted with patina Rub 'n Buff (although the pictures don't show it very clearly).


The last step was staining the crinkle ribbon, then stenciling stars in Faded Jeans ink. This is probably the first tag of 2013 that I really liked! The process was also a lot of fun!
Monday, September 2, 2013
Recent Birthdays
Our older son just turned 30. I finally can do numerals in any size with my Cricut Mini. The upper section was embossed with an embossing fold and then the raised images were inked with Distress Ink.

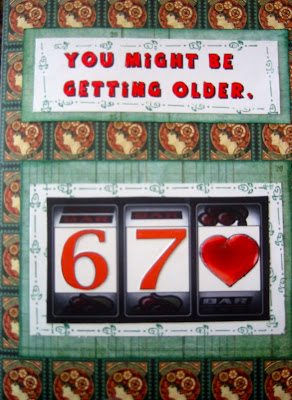
My sister and I play lots of games through Facebook which gave me this idea for her birthday card.

This last card is for my good friend, Nancy. We've been friends since high school and even though we rarely see each other, we always pick right up where we left off. She is my "forever friend."
I used the same embossing folder that I used on my son's card, and I used music card stock both outside and inside since we became friends through choir and madrigals. I've been using a lot of frames and shadows lately because there are so many options in my Elegant Edges Cricut cartridge. Completing the cover is a favorite vintage photo, a layered flower, and a Tim Holtz "forevermore" token.


My sister and I play lots of games through Facebook which gave me this idea for her birthday card.


This last card is for my good friend, Nancy. We've been friends since high school and even though we rarely see each other, we always pick right up where we left off. She is my "forever friend."
I used the same embossing folder that I used on my son's card, and I used music card stock both outside and inside since we became friends through choir and madrigals. I've been using a lot of frames and shadows lately because there are so many options in my Elegant Edges Cricut cartridge. Completing the cover is a favorite vintage photo, a layered flower, and a Tim Holtz "forevermore" token.

I usually try to make the coordinating inside special, too!

Subscribe to:
Posts (Atom)