Sunday, March 31, 2013

Happy Easter!

With our Easter service and Easter dinner behind us, I wanted to post a few of the things I made in celebration of Easter.

Last week I got my cards made and went with a vintage theme inspired by old Easter postcards. I don't like to make any two cards exactly alike, but the general theme and layout are similar.


The papers inside coordinated with the ones on the fronts.

Two weeks ago I went to the Craig Bachman semi-anual sale http://www.craigbachman.com. It's great fun and their items are mostly florist supplies at 50% off wholesale. This time I was on the lookout for four small containers to hold candy for each person at our small Easter gathering. I finally found little painted buckets (.75 each) in four spring colors. I stamped an Easter bunny and eggs on each and colored the images with paint and permanent markers. Then I made a "Happy Easter" bloom to stick in each chocolate-filled bucket.


I also found two clay pots at the sale that had been hand painted with spring flowers ($1 each). By adding silk flowers, decoupaged eggs, butterflies, and pastel grass, they became today's centerpiece (they don't look as scraggly in real life:) . We thought our table looked quite festive!


Here is what I made last year to hold the Easter candy:


I hope you had a nice Easter!!


Monday, March 18, 2013

Foil Tape

YouTube is a wonderful resource for craft ideas and techniques. One of my favorite artists, RachO113, does amazing work. One video in particular, Metal Tape Art, 

http://www.youtube.com/watch?v=HLJO8W-0iPk&list=UUCjnlp_6bz8l5tdDot22UCA&index=19 

shows how to construct a foil covered collage that looks like a thick metal assemblage. Today I followed her directions and was pretty satisfied with my results. Here is the step-by-step process.

1.  I began by using a cardstock base and gluing a variety of metal, plastic, and chipboard pieces, letters, and ribbon to it.


2.  I then cut my 2 inch wide silver foil tape (from the hardware store) into a variety of sizes and began to randomly adhere them over the base.


3.  Using an embossing tool (center) I traced around the glued pieces that were underneath the foil to define them. Then I distressed the smooth areas with my Tim Holtz texture hammer (left) and a variety of objects that would make interesting impressions such as the red marker cover (right).


4.  I painted over the entire piece with black acrylic paint and wiped most of it off. The black remained in the indentations. Autumn gold Rub 'n Buff was lightly spread across the raised areas and buffed out when it was dry.


The resulting piece will be used to decorate the top of a box that I use to store my fibers (although I haven't quite figured out yet how to cover the rest of the box :) It's a really fun technique to try!


Friday, March 15, 2013

Tag Backgrounds

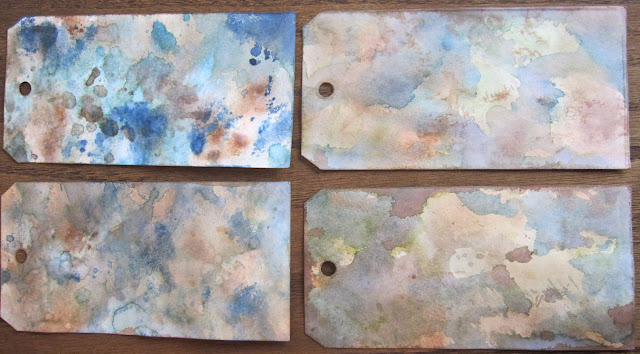
After my last posting about tags, I wanted to prep a few more to use at a later date.  I was happy with one background in particular and wanted to replicate it.  Not so easy!  It's impossible to recreate the random results of Tim Holtz's wrinkle-free distress stain technique, so I was somewhat disappointed in today's outcome.  Although I will undoubtedly use them all, they still didn't look like my favorite.  You can check out sample's of Tim's work to see how the professional does it!

This is the background color I was trying to duplicate.
Here are my unsuccessful results from today.


A while ago I came across a neat tag on the internet created by Suzanne K.  Its background was similar to embossing folders I had, so I thought I would try to re-create the neat metallic effect she achieved.  The center one was cut from manila cardstock that I covered with Black Soot Distress ink, embossed, and highlighted with Rub 'n Buff.  The outside two began life as black linen cardstock, and the embossing was highlighted with other shades of Rub 'n Buff.  Eventually I will embellish them.

Here is the only tag I actually finished today. I colored the tag with Vintage Photo Distress ink, embossed two sections of the tag and sanded those areas, stamped the trees and birds with Walnut Ink, lightly misted the entire thing with a Perfect Pearl shimmer, and added a copper gear.  I think I will use it as a bookmark.


Wednesday, March 13, 2013

Tags Galore

Tim Holtz is famous for the tags he creates and I love them all.  However fun they may be to create, they don't serve any grand purpose that I can easily see.  I suppose they can be attached to gifts, wine bottles, and cards or used as bookmarks.  I seem to have assembled quite a collection. The good thing about tags is that they are small projects that lend themselves to technique experimentation.

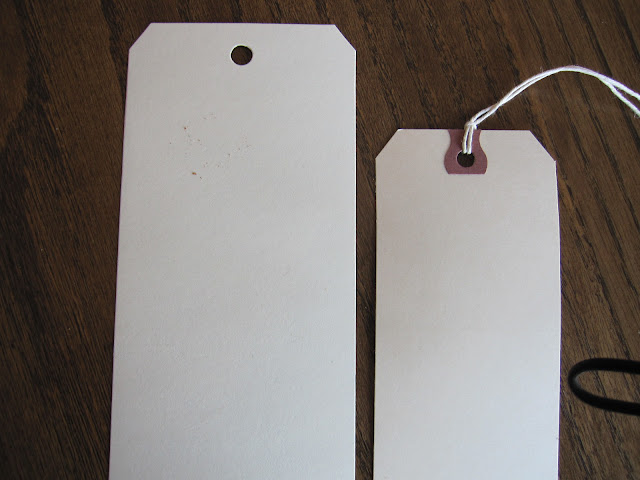
I began with a package of shipping tags at Office Depot and they work fine but are a bit small to handle all the embellishments Tim used. Apparently he has a larger size he uses, and now there is a Sizzix die that I use to make bigger ones. Here's a side by side comparison.


I usually cut out the tag from patterned cardstock to use as a base or I take a blank tag and stamp on it.


The tag on the left is cut from a Graphic45 sheet while the smaller one on the right has been stamped with the
Tim Holtz 's Adverts cling rubber stamps.


This tag was embossed in an embossing folder and the raised areas inked.
The die-cut gears, saying, and film transparency were used as embellishments.


The dress form was stamped in Versa Mark and heat embossed with white embossing powder, then the numbers stamped with Staz-On permanent black ink. I blended distress inks all over the card and wiped the ink off the embossed image. Other images were stamped in a variety of colors and a chipboard postmark added.


I made this to attach to my husband's Christmas present.


I love these Roaring Twenties bathing beauties found on one of the  Graphic45 'On the Boardwalk' sheets. The central image on the tag on the right was covered with packing tape, soaked in water, and made translucent by rubbing off the wet paper backing (the image remains on the tape).


I experimented using color on the photostamped image (left tag) and mounted it on foam tape over a set of pink stamped wings. The one on the right turned out pretty weird so I just included it for laughs!


Here are four large tags I made today. I first used distress stains to color the background, stamped them, then added tickets and other embellishments I made in addition to metal elements. Last I added the strings, fibers, and ribbons through the top holes.


I think this was my favorite from today :)

Sunday, March 10, 2013

Embellishments

Gluing small objects to my projects proves irresistible to me! Sometimes the embellishments drive the project, as in this birthday card that I made for my handyman husband. After finding these great tiny tools at a scrapbook store, I searched the internet for inspiration before creating his birthday card. The tool belt card front is brown paper that was scrunched then inked. I sewed the pockets and strapping, added silver paper fasteners, then added the tags and tools.


inside

I love my Tim Holtz ticket strip die and ticket stamp set and used them to make the personalized ticket embellishments on this next card. I made the music rosette by accordion-folding a strip of paper, attaching the two ends to make the rosette, then hot gluing it to a circle stamped with a treble clef. The tickets were glued to a shadow newsprint ticket and the sentiment, butterfly, mesh ribbon, and button added.


ticket strip die and ticket stamp set


Other embellishments that I like to make are paper flowers. After die cutting different sized flowers out of colored cardstock and plain newsprint, the edges were inked and the petals were shaped before  layering. The layers were grouped together with sparkly paper fasteners.

sorry for the blurry picture

(Last week I ordered a large lot of Tim Holtz metal Idea-ology embellishments on eBay that I'm sure will be prominently featured in upcoming projects. Can't wait!)

Friday, March 8, 2013

Sweet and Lacey


Although I love the vintage look best, it's not to everyone's taste. Occasionally I opt for pretty (mostly pink) using ribbon and lace.

Valentine for my mom


Shabby chic


More pink


Baby girls have to have pink


Same idea for a boy


Thursday, March 7, 2013

Inking and Collage


Tim Holtz's style and products have been inspirational (http://timholtz.com). I especially love his Distress Inks, how well they blend, and how reactive they are to water. In January I picked up some pocket calendars that had removable plastic outer covers at Michaels, and I decided to replace the cardboard covers with my own. I experimented with color combinations, embossing relief, stamping, and embellishments. At the end I sprinkled water over them to create lighter drips that gave them a slightly vintage look. Even though most people use a calendar app on their phones and computers, I still like carrying a "hard copy" in my purse. Here are a few example of what I came up with.


my first attempt

back
I included silk petals (dyed with watered down Distress Inks) on the cover of each.


I used Staz-On permanent ink for the main stamped images.

Here's what the cover looks like when it's lying flat.


Many of my projects end up being a combination of stamping and collage. This is one of my first attempts building a full-blown collage. At the time I was experimenting with translucent images superimposed over other elements to create an autobiographical piece. The photo is printed on a transparency.  
Sorry about the glare and skewed view!

A few months ago we had our kitchen re-painted, and the lemon stenciling I had done on the soffits was history. I took down all the lemon-themed items I had displayed over our upper cabinets and replaced them with white and metallic French country elements. However there was a blank spot on one wall that really needed something. I found a whitewashed shabby chic frame and came up with this collage. The background is a lovely impressionistic napkin that I stamped in random areas before adding the other elements. Of course I had to include one of my faux family photos!


Glare here as well and slightly out of kilter!

Wednesday, March 6, 2013

Recent Projects

Do you ever have so many ideas swirling about in your head that you don't know how to sort them all out? I often feel so frustrated by all the craft techniques, products, YouTubes, etc. that I see, that I become immobilized. Today I just had thaw my brain freeze, hit the craft room, and dive into my stash to crank out a few cards for friends.


My good friend recently lost her father who had been bed-ridden for several years, so I used a new fiber to frame the front of her sympathy card. I love the look of images stamped in white, but have yet to find a great white ink that is vivid. I ended up using a white paint dauber to get the image to stand out.


Two others have recently been hospitalized and undergone surgery, and I made two totally different style get well cards for them. This cheery card uses Stickles to add a bit of glitter.


The second get well card is more my style which is vintage grunge. I used a combination of embossing and stamping on the background paper and added an embossed leaf made from foil tape treated with black acrylic paint and two Rub 'n Buff colors. 


Lately I have been obsessed with photo realistic rubber stamps. I have several vintage collections from Oxford Impressions and a few stamps from Stampsmith. It takes a lot of experimenting with inks, paper, and technique for the stamped images to truly look like photos. After achieving a variety of results with the stamps, I made an "family" album to showcase them.


One of my favorite go-to techniques is embossing brown paper (from a grocery bag), then applying Distress Inks to achieve a leather look. The center plate, binding, and corners are copper card stock treated with Black Soot Distress Ink. 


These are (stamped) photos of my "faux family".


 This is the only Tim Holtz stamp that I used:


For the back cover I used large eyelets threaded with lace seam binding (colored with Black Soot Distress Ink).