Sunday, April 24, 2022

Anna Griffin Fan Mail Friday - February 25, 2022

 I won the Salon Nouveau Finishing School kit from Anna Griffin's Win It Wednesday! Here's the thank you card I sent her using materials from that kit. 


She featured my card here https://annagriffin.com/fan-mail-friday-extremely-grateful/

There's a picture on her blog and it's shown in her video.

Wednesday, May 20, 2020

DAY 15 - EASIEST SHAKERS EVER


Today's guest artists were Kristina Werner and Heather Ruwe. Each did her own version of easy shaker cards. 

I used Kristina's method of cutting 8 frames from heavy copper metallic cardstock, adhered one to an acetate circle, then stacked and glued the rest, filled the well with some sparkly bits, and then attached the whole thing to my prepared underwater scene. I added some gold Nuvo crystal drops to the porthole to act as the bolts. I used two stamp and die sets for my first card which had so many pieces that I turned it into a 5x7 inch card.


I first stamped several images from the MFT pirate set and then did the same with some cute sea creatures. 

(The toucan die in the lower right corner was used to make my second card)

I'm trying to use up as many bits and bobs that I've made over the ages, and I had a pale blue alcohol ink piece that I took and cut several circles from as the background of my shaker. 

In the upper left piece I stamped some sea creatures with Memento black and dried that with my heat gun. The ink still wanted to remain wet and didn't play well at all with the background blue. I finally used Copics to color in the creatures which was disastrous. The Copics picked up the stamped black ink and I finally outlined each image with a fine black Sharpie after coloring. (It actually looks better in the photo than in person.) On the other two circles I temporarily placed other images that I had stamped, colored, and die cut which seemed to give me a cleaner result. On the upper right circle I used a light layer of Nuvo turquoise glitter drops but it was really splotchy. Eventually I used the lower circle and several of my diecut images glued to the shaker background.


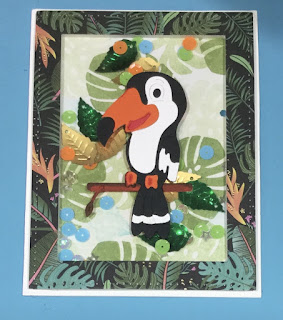
My second card used a tropical paper frame mounted on foam tape. I used first and second generation stamping of tropical leaves for the background. Although it's hard to see I had gold and green metallic leaves from a sequin mix which I used in addition to other regular sequins that matched the colors in the patterned frame. I used my toucan die to cut all the bird and branch bits that I pieced together and glued. I attached it to to the front of the acrylic window and mounted the whole shebang onto a white A2 card.

Tuesday, May 19, 2020

DAY 14 - WATERCOLOR INSPIRED BY CHILDREN


We were supposed to use watercolors today (or other markers, inks, etc.) to tap into our inner child. What I like about this class is that you needn't do the exact techniques that are presented. Instead their ideas can be a springboard for ours. Here I used a combination of watercolor crayons, Brusho powder, and some tube watercolors. 


The background was inspired by landscape quilts that use a variety of fabrics to suggest rolling hills and fields. I added some die cut layered white flowers and then used the thin strips of watercolored paper (from the trim of the main panel) to create the flower stems and leaves in the manner a child draws flowers. I'm not going to add a sentiment yet (which I'll put in the upper right corner) until I decide what the occasion will be when I send it.


Monday, May 18, 2020

DAY 13 - DIE-CUT BACKGROUNDS


Both of today's presenters had many examples of piecing die cut backgrounds. Jennifer McGuire's were very complex and striking, but I didn't have enough time today to do them justice. Andy Granick's were more straightforward and gave me lots of ideas for quick cards. 


The Waffle Flower Big Dots Stamp & Die Combo is a set that I use over and over again. The sentiments are varied and bold, and I just love the versatility of the die. 


I die cut the background in both white and silver and layered them. I then cut rows of circles from sparkly cardstock using the die. I layered those pieces on the off cuts of the backgrounds and added them in a pattern of colors. The card is more bright and cheerful than it shows in the photos.


I'm caught up with all the days' homework assignments for now. Let's see what tomorrow brings.


DAY 12 – GEOMETRIC PATTERNS WITH BASIC SHAPES


The video today was by Laura Bassen. As always she did a variation on rainbow colors but this time she used 4 shades of each color cut in 4 sizes of squares in descending shades. She added dimension to each layer and her results were spectacular.

As I tried to come up with an original idea I kept thinking (in) circles. Then I wondered if I could make a wreath out of layered circles and also if I could use the Gina K wreath builder to help place them evenly. So that's what I did!

In order to cut a lot of circles out easily I used 3 background dies, each with different size circles. It took a while to find enough shades of each color but eventually with enough scraps and the help of one Copic marker, mission accomplished.


I found a sentiment that would fit in a circle that would fit in the center of my "wreath," stamped it in black on white CS, then glued that on a slightly larger black circle which I adhered to the card with foam tape. I matted the 4 1/2" card front onto black CS which was then attached to a 5" square white card base. 


Thanks for the neat idea, Laura!

😍


Sunday, May 17, 2020

Day 11 - Anti-Coloring


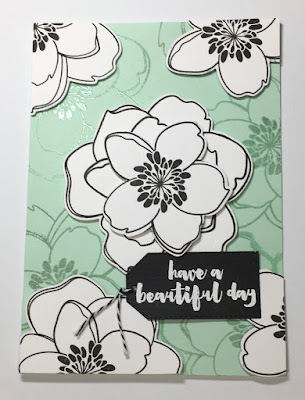
Today's theme was anti-coloring. One of my all-time favorites is Julie Ebersole and her video was great as always. I loved how she used Versa Mark to create a subtle background, then used the same image stamped in black on white, cut it out, and attached it to her background piece. Since I have the Mondo Magnolia stamp and die that she designed for Ellen Hutson, I chose that to pay homage to Julie.


The Mondo Magnolia die set will cut out both the entire stamped image or just the inner portion of it (as well as the stamen section). I used both sizes of the flower images and attached them to the card front with foam tape. For the center flower I layers the smaller flower on top of the large image with foam tape and turned it a bit so that it looked like this flower had even more petals.


Donna Mikasa is new to me but her card was also awesome. Stamping an image dipped in water onto a distress inked background gave an ethereal effect and then she, too, stamped her image onto white cardstock and attached it to the background. She used a favorite stamp and die set of mine, Altenew's Leaf Canopy set, so I just used it too so that I didn't have to tax my brain too much.